BrachySources Setup Guide
If you would like to see a video of the Setup and Calculate sections in-action then check out this YouTube demo video.
Installation
After purchasing the app you will be able to download the installer. After downloading the installer file, open it and follow the prompts to install BrachySources on your computer. Make sure to note the file path where you installed the app for future reference.
Setup
To set up the app, begin by clicking the File menu item and choose Preferences, or press Ctrl+E. The window shown below should appear.
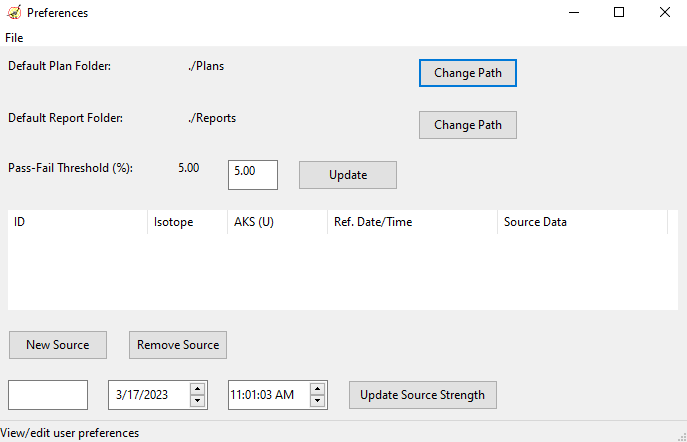
First, set the Default Plan Folder and the Default Report Folder using the corresponding Change Path buttons. The Default Plan Folder is where the app will initially look for DICOM plans, and the Default Reports Folder is where the PDF reports will be stored. By default, the app uses a Plans folder and a Reports folder in the same folder as the app, but these paths can be changed to whatever folder(s) you prefer.
Next, update the Pass-Fail Threshold if desired. Calculated points below this threshold will appear green in the main calculation window, while values above this threshold will appear red. This threshold value is also printed on the PDF report.
Next, add a check source to use for calculation. Begin by clicking the New Source button; a new smaller window will appear to enter the source information. Enter an ID (i.e. name), choose an Isotope, and choose a Source Data Model that you want to use. The isotope is used for radioactive decay calculations, while the Source Data Model includes the AAPM TG 43 data used for dose calculation. Click the Add Source button to add the source, the smaller window should disappear and the new source should appear in the list on the Preferences window. If at any time you would like to remove a source from the list, use the Remove Source button.
To finish setup, update the source strength for the check source you just created. Enter the source strength (in units of air kerma strength or U) in the text box in the lower left corner, then set the date and time in the neighboring boxes before using the Update Source Strength button to update. You can close the Preferences window and are now able to perform calculations, as described in the next section.
Calculate
Use the image below, showing the main calculation window after a successful calculation, for reference.
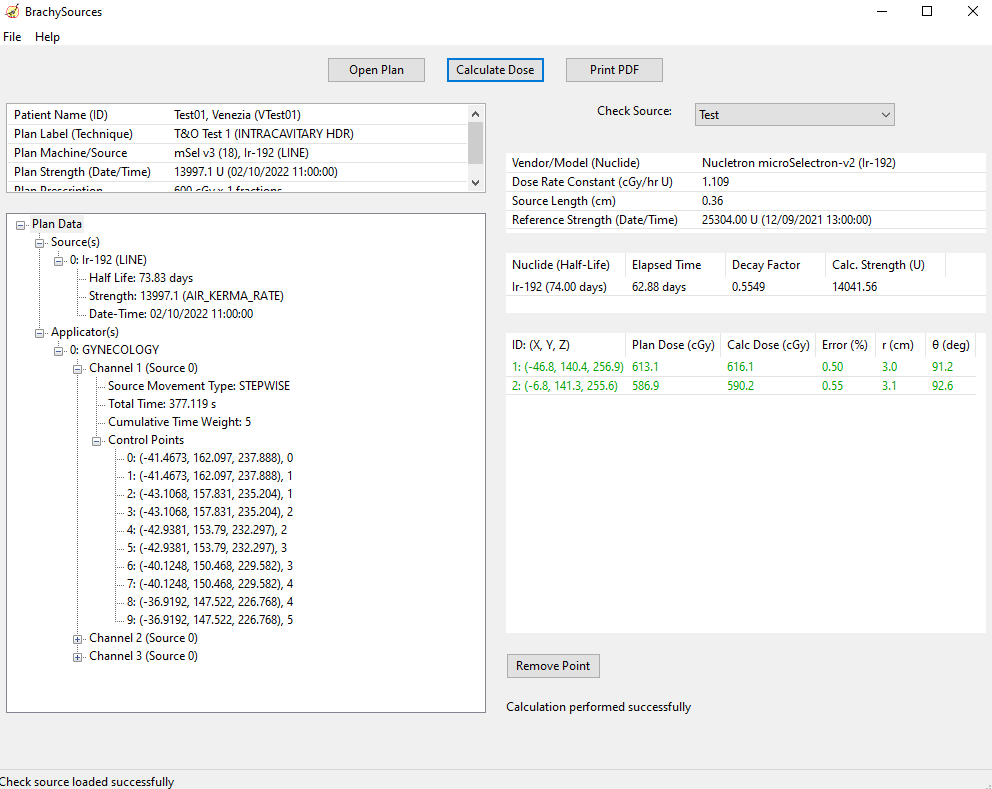
To calculate the dose to a plan, first use the Open Plan button to load a DICOM plan. A dialog window will appear allowing you to navigate and choose a DICOM brachytherapy plan. Either double click the plan file or select the file and use the Open button to load the plan. The patient information list and the plan tree in the upper-left and lower-left panels, respectively, should update; this enables you to view the details of the plan such as patient/plan name, sources, applicators, and catheter control points.
Next, use the Check Source dropdown menu in the upper-right corner of the window to choose a source (i.e. the one you created in the Setup section). The source info list just below the dropdown will populate with the check source information.
Then, click the Calculate Dose button to perform a calculation. The app will calculate dose to all points stored in the DICOM plan and compare the app-calculated dose to the point dose stored in the plan. Both the isotope decay calculation and the point dose calculation results will appear in the lists below the source information. Points that pass under the Pass-Fail Threshold set in Preferences show as green while those that fail show in red. You may delete any point using the Remove Point button. Below the point calculation list there will be comments related to the calculation, for example ”Calculation performed successfully”.
Finally, if desired use the Print PDF button to print a PDF report, which will be saved to the Default Report Folder set in Preferences. The report contains all the data shown in the calculation and has a file name based on the patient and plan names as follows: “PatientName PlanName Calculation.pdf”.
Updates
Updates to BrachySources are completely automated. The app will check for updates every time the app is opened, and will install an update if one is available. If it seems like the app is taking longer than normal to start up, it is most likely because an update is occurring. After an update, a message box will appear describing whether the update succeeded or failed; if the update is successful then the app will automatically restart, opening the latest version.